
Solution Guide
Stuck on How 2 Escape: Lost Submarine?
Don't worry, here’s the official walkthrough to guide you through it!
Contents
RESCUE SUBMARINE

Here is the first room of the game: the Rescue Submarine.
To clear this room, you must solve three puzzles in total. However, to access the third puzzle, you first need to solve two specific ones:
Only after solving these will the third riddle become available.
Collapsible text is great for longer section titles and descriptions. It gives people access to all the info they need, while keeping your layout clean. Link your text to anything, or set your text box to expand on click. Write your text here...
> Solution: The Periscope
A part of the periscope is lying on the floor. To access the puzzle, you must pick it up and attach it to the designated spot on the ceiling.


To solve the puzzle, you’ll need a 6-digit code.
Click on the periscope to look outside, where you'll see three different lighthouses. Each lighthouse features:
-
A unique pattern on its structure.
-
A light sequence that is projected
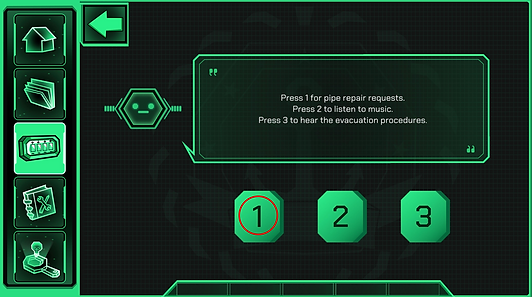
The Companion App player has a manual to assist solving the puzzle. He can find a double-entry table on the 1rst tab.
The table has columns for the lighthouses and rows for the light sequences.
Each junction between a lighthouse and a sequence corresponds to a specific number.
The main player must observe the light sequence related to each lighthouse. Each lighthouse is numbered from 1 to 3 meaning the order you will have to enter each number.
Using the description, the Companion App player matches the lighthouse's pattern and light sequence on the table to find the corresponding number for each lighthouse.
Example:
There is a stroke pattern on the 1rst lighthouse with the following light sequence: yellow (triangle), blue (square), red (circle), yellow (triangle).
The player needs to locate the column corresponding to the lighthouse with this horizontal stroke pattern and the row matching the previously described light sequence. The number 21 can be found at the intersection of these two pieces of information.


Combine the numbers for all three lighthouses into the 6-digit code. In this case, the solution is 214413.
1rst lighthouse = 21
2nd lighthouse = 44
3rd lighthouse = 13
> Solution: The Abyss

In the room stands a large machine equipped with sliders, buttons, and three screens. The players' objective is to uncover the coordinates leading to the Triomphant submarine—their ultimate destination. To solve this puzzle, three key pieces of information are required: latitude, longitude, and oxygen.
On one of the screens, a post-it displays a code referred to as the Codex Code—a recurring element in the game. This code must be communicated to the Companion App player. In the Companion App, a widget called Codex (the third widget on the left, represented by a locker icon) is used to input this code.

Once the code is entered in the Codex widget, a screen displaying the ocean floor and a slider appears. The slider adjusts to different depths, with the fauna and flora changing at each stage.
The big machine near the rescue submarine has three screens, each corresponding to one piece of information: latitude, longitude, and oxygen.
Each screen displays a unique visual: A shoal of tuna, a specific rock and specific seaweed.
The task is to describe these visuals to the Companion App player, who must locate and click on them to read their information.
The shoal of tuna refers to the latitude.
The rock refers to the longitude.
The seaweed refers to the oxygen.


The solution is :
-
Latitude : -120
-
Longitude : 30
-
Oxygen : 14
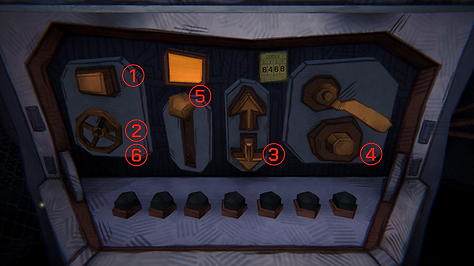
> Solution: The Levers

Once the two other puzzles are solved, the upper section of the left machine will unlock. This part serves as a tutorial to demonstrate how the hint machine works. Simply follow the instructions displayed on the three screens of the abyss puzzle machine.
First of all, take the hint card positioned above the levers.

How to use the Hint Machine?
-
Click on the machine, then select the button labeled “Levers.”
-
Click on Hint 1 to unlock it.
-
A code will appear: “F1WJC.” Share this code with the Companion App player.
On the Companion App, the last widget in the left menu (represented by a magnifying glass with a question mark) is the Hint Widget. The Companion App player must enter the code here to reveal the hint.
The tutorial hint explains how to open the door. The Main Player must activate the levers in the following order:
-
Fourth lever
-
First lever
-
Third lever
-
Fifth lever
-
Second lever
WARNING: Unlike the rest of the game, this is the only moment where a hint card reveals the solution.
Once the levers are activated in the correct order, the door will open.
Congratulations!
You’ve cleared the first room. Proceed through the door to continue the game and begin the second room.
TIPS: Accreditation Code Process
To access the content of a new room, the Companion App Player needs to update their application. Here's how to do it:
At the end of each room, the Main Player will see a panel displaying an accreditation code. The Main Player has to share this code with the Companion App Player.
Instructions:
-
On the Companion App, navigate to the main menu (represented by a home icon on the left part).
-
Look for a widget with a badge icon. Tap on it.
-
Enter the accreditation code provided by the Main Player.
Once the code is entered, an audio cinematic will play, followed by a loading screen as the app updates.
After the update is complete, the Companion App Player will gain access to the new room's content, and the corresponding widget will be unlocked.

THE MACHINERY

To access the content of a new room, the Companion App Player needs to update their application.
Here's how to do it:
At the end of each room, the Main Player will see a panel displaying an accreditation code. The Main Player should share this code with the Companion App Player.
Here is the accredidation code that unlock the Machinery content:

Instructions:
1. On the Companion App, navigate to the main menu (represented by a home icon on the left part).
2. Look for a widget with a badge icon. Tap on it.
3. Enter the accreditation code provided by the Main Player.
Once the code is entered, an audio cinematic will play, followed by a loading screen as the app updates.
After the update is complete, the Companion App Player will gain access to the new room's content, and the corresponding widget will be unlocked.

Here is the second room of the game: the Machinery.
The goal of this room is to repair the water machine, repair the electricity and the oxygen machine.
The Electricity Puzzle
The Oxygen Puzzle
> Solution: Water

There a large machine with 5 vats and five portholes and a codex code is written on a post-it attached to one of the vats
The Companion App Player must enter this code into the codex widget.
Once the code is entered, a representation of the Water machine displays on the screen.
The Companion App Player has access to four buttons, each corresponding to a specific pipe. The Main Player must describe the appearance of the four pipes connecting the vats, enabling the Companion App Player to select the correct ones.

Here is the solution:

After validating the correct answer, a new screen appears, displaying a visualization of the water machine and the states of water and fire on the portholes. The Main Player can adjust a lever on each porthole, while the Companion App Player describes the states shown on their screen. Using these descriptions, the Main Player must position the levers to match the states seen by their teammate.
Once the Main Player is confident that all levers are correctly set, they can activate a final lever located on the vat near the entry door. If the setup is correct, the light turns green signaling the completion of the first riddle.
Because the game is procedural, the setup and solutions vary depending on the codex code, ensuring a unique experience with each playthrough.
Here are all the answers:
If the codex code is 4855 :

If the codex code is 4217:

If the codex code is 8425:

> Solution: The Electricity Puzzle
1rst Part:
At the beginning of the puzzle, the Main Player will find an electrical cabinet located next to a wire fence. This cabinet features 8 outlets and 5 wires. The goal in this first section is to connect the five wires to the correct outlets.
To determine the correct wiring configuration, the Companion App Player must consult a specific page in the manual provided within the Companion App. This page contains four different wiring diagrams. Each diagram shows different wire positions, so the Main Player must describe the wires layout.
Each wire has black and white segments shown in a flower-like diagram. The white part represents the outside of the wire. Since the wire is plugged in, the pattern the Main Player sees is reversed.
Here's an example:

Once all wires are correctly placed, the fence opens, and you can move on.
Here are all the solutions:


2nd Part:
Inside the new section of the room, the Main Player pulls a lever, locking themselves in and activating a new machine. Revealing a post-it note displaying a Codex code.
As in previous puzzles, the Main Player must read this code out loud and communicate it to the Companion App Player so they can input it into the Companion App.
Both players now have control panels. Both panels are divided into two distinct parts.The 1rst one includes controls such as valves, levers, and buttons while the other one displays a set of lights. Each player can interact with only one part: the Main Player with the controls, while the Companion App Player can press the buttons corresponding to the lights.
This part of the puzzle functions as a synchronization challenge. The Companion App player begins the process by pressing the “Play” button. Once activated, one of the controls lights up on this control panel, it’s the one that the Main Player must interact with.
As soon as the Main Player performs the correct action, one of the lights of his control panel turns on, it’s the one that the Companion App Player must press.
For example, the 3rd light turns on, signaling that the Companion App Player now needs to press the 3rd button. The players continue alternating actions in this pattern, working together through the final action.
When all of the lights turn green, the machine is considered fully repaired. At this point, the door will unlock, the players will be reunited, and the puzzle will be successfully completed. Congratulations!
Here are the different patterns:


> Solution: The Oxygen Puzzle
This puzzle is focused on stabilizing the oxygen levels in the room. It involves three key elements:
-
The oxygen engine, likely the first thing players notice when entering the room
-
A metal chest that looks like an oven
-
and 9 modules scattered across the room, including some locked inside the chest
The goal is to find and install the three correct modules into the oxygen engine. These modules come in three types. Six of them are freely accessible in the room, while the remaining three are locked inside the chest.
To access the 3 locked modules, players must open the chest using a six-digit code.
Next to the chest, the Main Player can find a document with a reference code. For example: RFZ-646-ACM. This code corresponds to one of the six tables found on the “Oxygen” page in the Companion App Player’s manual.
Each table has four columns, which represent the four buttons of the chest. Each row in the table shows one black square—this square indicates which button to press in that row's sequence (e.g., if the black square is in the third column, the third button must be pressed).
Here's an example:

By following the six rows from top to bottom, the Companion App Player builds a six-digit code for the Main Player to enter.
Once the correct code is entered, the chest opens, and all modules become available.
Here are all the solutions:
If the codex code is 2022:
If the codex code is 1524:

If the codex code is 1311:
If the codex code is 8896:

How to find and plug the right modules?
Inside the engine, a Codex code is displayed. The Main Player reads this code aloud. The Companion App Player enters it into the Companion App, which reveals the three required modules.
The Companion App Player must now describe these modules clearly. The Main Player searches for the matching modules in the room and places them into the machine.
Once the correct modules are installed, the oxygen stabilizes, and the puzzle is solved.
Here are all the solutions:
If the codex code is 2022:

If the codex code is 1311:

If the codex code is 1524:

If the codex code is 8896:

Once the 3 puzzles are solved, the door will open.
Congratulations!
You’ve cleared the 2nd room. Proceed through the door to continue the game and begin the third room.
THE CANTEEN

Here is the third room of the game: the Canteen.
The exit door is locked due to three broken pipes releasing hot steam.
The goal of this room is to shut off the pipes in order to exit
> Solution : The Robot Puzzle

There is a codex code pinned to the top-left corner of the blueprint.
The Companion App Player controls a robot inside the submarine’s ventilation system to find three post-it notes, each containing part of a code to switch off the light.
Meanwhile, the Main Player must analyze the map to guide the Companion App Player through the ventilation maze.
Be careful: some paths are blocked, but they are not shown on the map.
Here’s one possible route to collect all three post-it notes:
If the codex code is 2787:

If the codex code is 3634:
Once that’s done, you’ll be able to enter the correct code by pressing the buttons located to the left of the blueprint.
If the codex code is 2787:

If the codex code is 3634:

After entering the code, the red button becomes available. Press it, and the light switches to UV mode.
Now, find the correct spot where stains are revealed under UV light — they’ll show you how to position the levers.
There is a blue photo in the photo gallery. The Companion App Player must describe where this picture was taken. Once the Main Player reaches that spot, everything should align perfectly!


The UV stains reveal the correct positions for the levers.
> Solution: The Ship’s log Puzzle
There is a projector on a table near the first floor, and six VHS tapes scattered around the room.
Insert the VHS tapes into the projector and watch what they show.
Each tape reveals a moment the submariners spent aboard the submarine — for example: Christmas, watching a movie, playing cards, cooking, a Mexican party, and an oxygen drill.
The goal of this puzzle is to find the correct lever positions. Each VHS tape shows a red lever in a specific position.
How to find the correct tapes?
There are three logs in the Companion App Player’s manual, each one describes a memory or event.
The first log, titled “Christmas” is about
The second log, titled “Cut off from the world” is about
The third log, titled “Alexandre was cheated” is about
Match each log to the correct VHS tape.
Three tapes, one lever shown in each — place each lever in the correct position shown on the matching tapes, and you’ll solve the puzzle.
Here is the solution:


> Solution: The Artificial Intelligence Puzzle
The final puzzle is located on the first floor, and it’s the longest challenge of this room, consisting of 6 steps.
Step 1: Share the Codex Code
There’s a codex code pinned to the board: 0904
Once the Companion App Player enters the codex and launches the interface, press the first button.
An Artificial Intelligence will assist in repairing one of the broken pipes near the exit door.
But first, it needs to identify which submarine the Main Player is on — and will ask a few questions.
Step 2: Provide the Dive Date
The AI asks for the dive date, formatted as MM/DD/YYYY.
On the board, there is a calendar. A specific date is circled in red, with a submarine icon next to it.
The correct date is: 01/01/2024

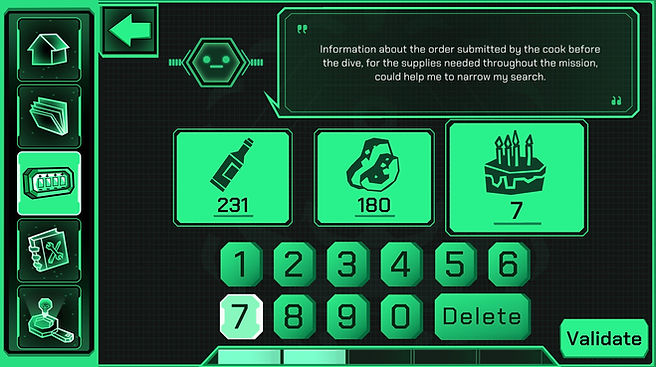
Step 3: Provide the Cook's Supply Order
The AI now asks for the cook’s pre-dive order:
-
Number of wine bottles
-
Kilograms of potatoes
-
Number of birthday cakes
All this information is available on the board.
Wine bottles:
There’s a note on the board containing the necessary information. You need three pieces of data:
-
Bottles per day:
The note says: “2 daily bottles”. So there are 2 bottles drank per day
The submarine voyage lasts 90 days (January, 30 days / February, 29 days / March, 31 days)
2 × 90 = 180
-
Bottles for birthday parties
Check how many birthdays occur during the dive — using the calendar (check birthday cakes solution below). There are 7 birthdays.
The note says: “For each birthday, we will need 3 bottles of wine”
3 x 7 = 21
-
Bottles for poker nights
The note says: “Add 5 bottles for poker nights”. Count the number of card icons on the calendar.
There are 6 poker nights.
5 x 6 = 30
Now, add everything together: 180 + 21 + 30 = 231
Wine bottles total: 231
Potatoes:
The same note also includes data about potato consumption. It says: “2kg of potatoes per day”
The submarine trip lasts 3 months:
January: 31 days
February: 29 days
March: 30 days
→ Total: 90 days
The note says: 2 kg per day
→ 2 × 90 = 180
Potatoes total: 180 kg
Birthday cakes:
The Main Player needs to check the calendar and count the birthday cake icons.
There are 7 birthdays
Final Recap
Wine bottles: 289
Potatoes: 180
Birthday cakes: 7
Step 4: Time zone
For the next step, the AI requires three pieces of information:
-
The dive location
-
The submarine’s current location
-
The submarine’s final destination
Dive Location:
Each player has access to this information. On the Companion App, France is highlighted on the map. Similarly, there is a note on the physical board titled "Start zone" with France also highlighted. Therefore, the dive location is France, which is in the UTC+0 time zone.
Submarine’s Current Location:
A clock on the submarine, next to the physical board, shows 8:30 AM. Meanwhile, the Companion App displays 3:30 AM. This indicates a 5-hour difference. Since we know the Companion App player remained at the base (UTC+0), it means the submarine is currently in a UTC+5 time zone.
Submarine’s Final Destination:
Another note on the board reads: “A report is required when we arrive at our final destination. When calling, bear in mind that the base will be 7 hours behind us.” This implies that the submarine's final destination will be in a UTC+7 time zone.

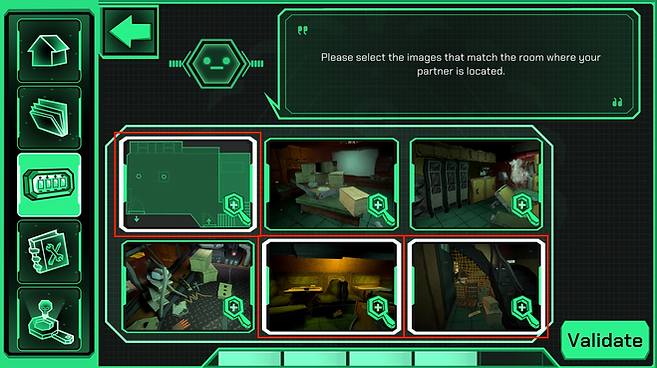
Step 5: Identifying the Correct Room Images
In this step, the Companion App Player must select the images that correspond to the room where their partner is currently located.
To do this, the Companion App Player describes each image they see, and the player inside the submarine must confirm whether the image matches their current room.
There are three correct images to select, and one of them is a top-down view (floor plan) of the room.
Here are the correct images to choose:
Step 6: Lever Configuration
This is the final step. The AI now has all the necessary information to provide the correct instructions for adjusting the levers. By setting them to the correct positions, players can repair one of the broken pipes near the exit door.
The Companion App Player gains access to a “Repair Manual”.
To solve the puzzle, they must analyze the manual and examine the machine next to the board inside the submarine. This step involves three tasks:
-
Checking the gauges
-
Reporting the serial number
-
Inspecting the pipes
Appendix G-38 presents three possible scenarios:
-
All the needles are pointing to 5
-
Each gauge is hexagonal (6 sides)
-
One of the gauges is located on a different side of the machine

Only one of these is correct: the gauges are hexagonal.
According to the manual:
“If this is the case, set the right lever to 180°.”

Report the serial number:
There is a page titled “Serial Number” in the manual.
The player is instructed to read the serial number written on the machine. It can be found in the top-left corner and reads: AB-RH-AC

Since the serial number contains only letters, the manual directs the player to:
“If it contains only letters, read Appendix S-10.”
In Appendix S-10, the correct instruction is:
“If the letter A appears two or more times in the serial number, then set the left lever to 135°.”
This applies, since “A” appears twice.

Check the pipes:
On the “Pipes” page in the manual, the question is:
“How many pipes are connected to the machine?”
The Main Player sees 2 pipes, so the Companion App Player is instructed to:
“If there are 2, read Appendix M-6.”

In Appendix M-6, the relevant condition is:
“If one of the pipes connects the right lever to the floor, then set the middle lever to 45°.”
This condition is true.

Final lever configuration:
-
Left lever → 135°
-
Middle lever → 45°
-
Right lever → 180°
With these settings, the broken pipe near the exit door can now be repaired!
Congratulations!
You’ve cleared the 2nd room. Proceed through the door to continue the game and begin the third room.